

![How to Root Samsung Galaxy J7 Step by Step[Trick Guide]](https://blogger.googleusercontent.com/img/b/R29vZ2xl/AVvXsEiM7XNqkR0YDlwYUrW7q8ISlazd5EzvZNKO6SXaX1JdVekvSXELDK9OyagqZ165EarL6Kf60Ih3t1M61C1gPxh0fWu3uE_BAo1J7KLicDTezUfmySPQ_qZvOQEZ5lx-jMjHO23v74lwlK8/s1600/Install-TWRP-Recovey-And-Root-Samsung-Galaxy-J7.jpg "How to Root Samsung Galaxy J7 Step by Step[Trick Guide]")
Note: - Trickszeal is not Responsible for any damage of your device you have to do at your OWN Risk.Before going to root your device Backup your Data.Rooting your device may lose the warranty of your device.
- Downloads Needed:-
- Odin3_v3.10.6.zip ( Unzip it)
- Samsung Kies
- Twrp-2.8.7.0-j7elte.image.tar (No need to extract it)
- Super SU
- Device Setting Developer Option:-
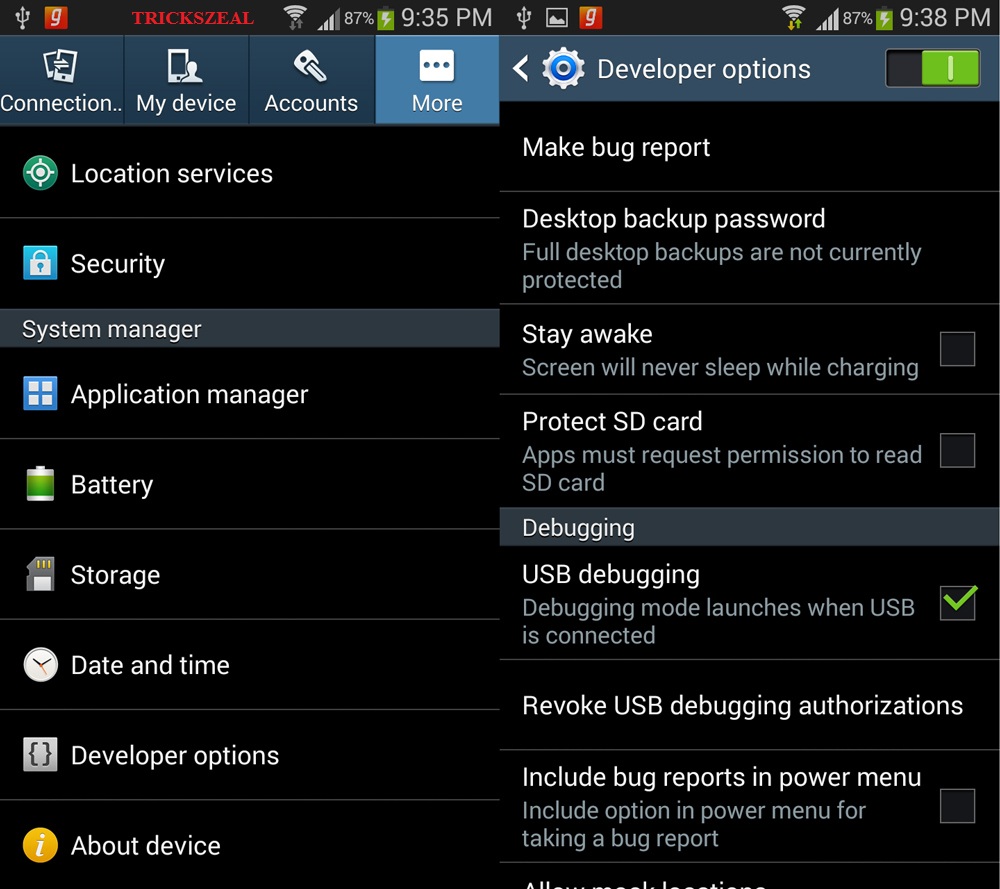
- Now go to settings>>About Phone
- Tap on Build Number for 7 times until you receive a message.
- Now go back to settings>>Developer Option>>USB Debugging,enable it.
- In this Developer option, you can also find the 'OEM Unlocking' option, you need to just enable it.
- Install Driver:-
Now Install the 'Samsung KIES' and restart your PC or computer, then connect your device with USB Cable.It will configure drivers automatically.
- SUPER SU:-
Now connect your phone to PC via USB cable, then transfer the SUPER SU files from your PC to the external memory device.
- Install TWRP Recovery on your Samsung Galaxy J7 SM-J700F.
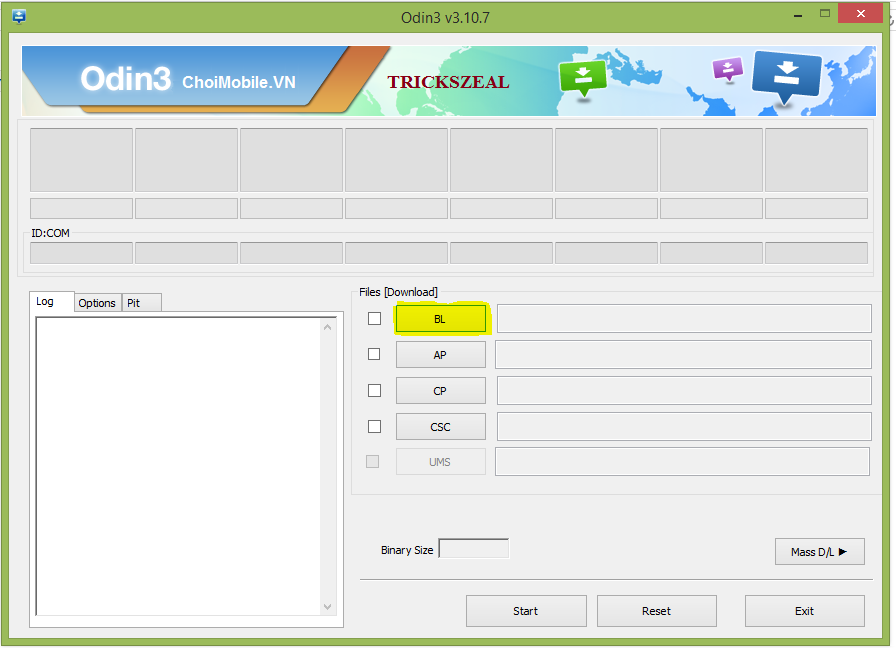
- Run as the Administrator of the Odin3 v3.10.0.exe file.
- Now click on the AP and Browse twrp-2.8.7.0-j7elte.image.tar, shown in above figure.
- Now Switch on your device J7.
![How to Root Samsung Galaxy J7 Step by Step[Trick Guide] image](https://blogger.googleusercontent.com/img/b/R29vZ2xl/AVvXsEhTzdc6dQrRffJsIRVeypEsu_AmYbsPI6wNZiTI9z0-qY__2ngB44fdZPqC3W2YGZ2QZYMi5acH8vwqGqgmYU31-0cImSMuLWJ0IROwxYdqkE8IEbfnftI9YAg2MWbu0krKy-xihpLBPDk/s640/1.png "How to Root Samsung Galaxy J7 Step by Step[Trick Guide]")
- Then Press and hold the power + Volume Down + Home button at a time until it shows a Warning screen.
![How to Root Samsung Galaxy J7 Step by Step[Trick Guide] image](https://blogger.googleusercontent.com/img/b/R29vZ2xl/AVvXsEiRsuho8MzLfopVd70Th_DBdCKmalkS_YKtR_ak6TIW_6zMCcHCMVCL0YFfn1rS7eCYuGSzJZAOCMG2-ky9iGdR6Niq6IHEMp5RJA459I2UrwJRIFuZyamRpw6DHSoD7MwnUIA48EK25KM/s400/4.png "How to Root Samsung Galaxy J7 Step by Step[Trick Guide]")
- After this Press Volume UP button to Continue.
![How to Root Samsung Galaxy J7 Step by Step[Trick Guide] image](https://blogger.googleusercontent.com/img/b/R29vZ2xl/AVvXsEgUuFWFpDmSZL-En9_SwJf5E7LSc619W74vD1aliYWhrw7OLRMUtpZwXB4oW_W1In3evYIOWHLZZcTGRclO5ixEVXbvFlkL5xgrQOy5UW-U2u1uRcXVaZBT57-0hUQWfo38yXe-_rWLmXA/s400/5.png "How to Root Samsung Galaxy J7 Step by Step[Trick Guide]")
- Now connect your phone to PC via USB cable.
- After this, you will be able to see the ID: COM in Odin and installed properly.
![How to Root Samsung Galaxy J7 Step by Step[Trick Guide] image](https://blogger.googleusercontent.com/img/b/R29vZ2xl/AVvXsEgYVKa212ffmaegwjjRXqnq2sk2kP8QxGrnhfHo90JLuNr2WPIHfHN0rWTtjIg54ZKaFIQ5fcseWQMMsOfDLHeis_lD3Hod_kq0V2NhyaLUlHc41dHX_WlHeaDASI9wepnXxdUP5Y6wSIo/s400/7.png "How to Root Samsung Galaxy J7 Step by Step[Trick Guide]")
- Now Click on the Start button on Odin to Pass.
- Once you Start, it will take few seconds to PASS, as shown in above fig.
![How to Root Samsung Galaxy J7 Step by Step[Trick Guide] image](https://blogger.googleusercontent.com/img/b/R29vZ2xl/AVvXsEhQSEHMO5Re8NBPzAf2Unj9B19BJCr-rcuUJ0-QQQ29KF0h6ryV_8JC06Ngg5XrilnUzqZjDERJMEJNcFRAdaE1s-1D3VtGRKNVK8rMud7yqQ_y_f8Y9yugad-XpPl067SXGsbRAfVMPwI/s640/9.png "How to Root Samsung Galaxy J7 Step by Step[Trick Guide]")
- Finally, Exit Odin and disconnect your device and switch it on.
![How to Root Samsung Galaxy J7 Step by Step[Trick Guide] image](https://blogger.googleusercontent.com/img/b/R29vZ2xl/AVvXsEhTzdc6dQrRffJsIRVeypEsu_AmYbsPI6wNZiTI9z0-qY__2ngB44fdZPqC3W2YGZ2QZYMi5acH8vwqGqgmYU31-0cImSMuLWJ0IROwxYdqkE8IEbfnftI9YAg2MWbu0krKy-xihpLBPDk/s1600/1.png "How to Root Samsung Galaxy J7 Step by Step[Trick Guide]")
![How to Root Samsung Galaxy J7 Step by Step[Trick Guide] image](https://blogger.googleusercontent.com/img/b/R29vZ2xl/AVvXsEiRsuho8MzLfopVd70Th_DBdCKmalkS_YKtR_ak6TIW_6zMCcHCMVCL0YFfn1rS7eCYuGSzJZAOCMG2-ky9iGdR6Niq6IHEMp5RJA459I2UrwJRIFuZyamRpw6DHSoD7MwnUIA48EK25KM/s1600/4.png "How to Root Samsung Galaxy J7 Step by Step[Trick Guide]")
![How to Root Samsung Galaxy J7 Step by Step[Trick Guide] image](https://blogger.googleusercontent.com/img/b/R29vZ2xl/AVvXsEgUuFWFpDmSZL-En9_SwJf5E7LSc619W74vD1aliYWhrw7OLRMUtpZwXB4oW_W1In3evYIOWHLZZcTGRclO5ixEVXbvFlkL5xgrQOy5UW-U2u1uRcXVaZBT57-0hUQWfo38yXe-_rWLmXA/s1600/5.png "How to Root Samsung Galaxy J7 Step by Step[Trick Guide]")
![How to Root Samsung Galaxy J7 Step by Step[Trick Guide] image](https://blogger.googleusercontent.com/img/b/R29vZ2xl/AVvXsEgYVKa212ffmaegwjjRXqnq2sk2kP8QxGrnhfHo90JLuNr2WPIHfHN0rWTtjIg54ZKaFIQ5fcseWQMMsOfDLHeis_lD3Hod_kq0V2NhyaLUlHc41dHX_WlHeaDASI9wepnXxdUP5Y6wSIo/s1600/7.png "How to Root Samsung Galaxy J7 Step by Step[Trick Guide]")
![How to Root Samsung Galaxy J7 Step by Step[Trick Guide] image](https://blogger.googleusercontent.com/img/b/R29vZ2xl/AVvXsEhQSEHMO5Re8NBPzAf2Unj9B19BJCr-rcuUJ0-QQQ29KF0h6ryV_8JC06Ngg5XrilnUzqZjDERJMEJNcFRAdaE1s-1D3VtGRKNVK8rMud7yqQ_y_f8Y9yugad-XpPl067SXGsbRAfVMPwI/s1600/9.png "How to Root Samsung Galaxy J7 Step by Step[Trick Guide]")
- Rooting of Samsung Galaxy J7 By using the Flashing SUPER SU:-
- First Switch of your Device.
- Now press the Volume UP + Home + Power button at a time it shows TeamWin.
- Tick the checkbox until it,"Never show this screen during boot again".
![How to Root Samsung Galaxy J7 Step by Step[Trick Guide] image](https://blogger.googleusercontent.com/img/b/R29vZ2xl/AVvXsEgrxEVyoZ04Ru1GKwbweLFHTl2wZwm_swVbZ-CGuUQEygb9EWzve8oI4l8e_mg5I__4Z2n0PHD3mqGaYwYj20SxiV09vQwDhhrK8vqDPzIovzyzxdpvJlTMuu_kmsBywz6x2UWSQjTQ6c8/s400/3.png "How to Root Samsung Galaxy J7 Step by Step[Trick Guide]")
- Now Swipe to allow Modification.
- Now Tap on install and browse the UPDATE-SUPER SU-v2.46.zip file(Store in External memory)
- If once you find the UPDATE-SUPER SU-v2.46.zip file and just tap on it.
- Now Swipe again to confirm Flash.
- Once the flashing is completed, then you will get a successful message.
- Finally, tap on Reboot System.
- Finally, your Samsung Galaxy J7 SM-J700F as been successfully Rooted.
![How to Root Samsung Galaxy J7 Step by Step[Trick Guide] image](https://blogger.googleusercontent.com/img/b/R29vZ2xl/AVvXsEgrxEVyoZ04Ru1GKwbweLFHTl2wZwm_swVbZ-CGuUQEygb9EWzve8oI4l8e_mg5I__4Z2n0PHD3mqGaYwYj20SxiV09vQwDhhrK8vqDPzIovzyzxdpvJlTMuu_kmsBywz6x2UWSQjTQ6c8/s1600/3.png "How to Root Samsung Galaxy J7 Step by Step[Trick Guide]")
To check whether your device as root access or not, you can check on 'ROOT CHECKER' app and run it on your device.


![[Guide]How to Root Xiaomi Redmi 2 With CWM Recovery Install image](https://blogger.googleusercontent.com/img/b/R29vZ2xl/AVvXsEh6Lsp-zrC3SfX67MIKleUKbqNeI8hLiAInUdzjF0cw2S-DsTQw_-4XYNeD-cHOEb1knzDpEn1kgL3Z0vxF-W1iwNd6rLlMRiLdXz1srLZK4acxXd3DyGUCHXicLZ25vLlJuZNqhezh2s0/s1600/maxresdefault.jpg "[Guide]How to Root Xiaomi Redmi 2 With CWM Recovery Install")
![[Guide]How to Root Xiaomi Redmi 2 With CWM Recovery Install image](https://blogger.googleusercontent.com/img/b/R29vZ2xl/AVvXsEgrrUF_z5vgERsT0ojzEh5CY60FZZ64ojpvf1r6zAQGo2waFi2-XBK95g3bW6DqJXtIQizLBL8PJSlW63N1Tn4GVUhXmOeKQ88aNIA1rs0u6v-hrMrRaosuTN8WhbjKurDBFvauO0uqwjA/s1600/Adb-and-Fastboot-Tools-For-Redmi-2.jpg "[Guide]How to Root Xiaomi Redmi 2 With CWM Recovery Install")
![[Guide]How to Root Xiaomi Redmi 2 With CWM Recovery Install image](https://blogger.googleusercontent.com/img/b/R29vZ2xl/AVvXsEjG-kF95anXkhzuRqB2AOFBl5UikPHQbyka_jWTHLYxZxCMoKqdyne8tq2GTlYljOr00qz9F6Yc4VL5CH1uQfgHqbs7frdZwSPyzGk5agnaVAyAomZjm7GfMIvdswl7wQQJKDz_J7TJuF0/s1600/Opening-adb-command-prompt.jpg "[Guide]How to Root Xiaomi Redmi 2 With CWM Recovery Install")
![[Guide]How to Root Xiaomi Redmi 2 With CWM Recovery Install image](https://blogger.googleusercontent.com/img/b/R29vZ2xl/AVvXsEjFb_mIIhNd-nqYqmdxlPvcFz94Eww_Hg5e2CxOuPyf8rLEzZs8d4NcQOhI-as_8Sbbdpgv-HMIWEQJv1jOTziWMz3HN6y1lxc5coQXrhmBXZzAocfUT6iBL0mK-C8-CQ6eVAUdHNL_MB4/s1600/Fastboot-commands-with-CMD.jpg "[Guide]How to Root Xiaomi Redmi 2 With CWM Recovery Install")

![How to Root ASUS ZenFone 5 Kitkat 4.4.2[Guide] logo](https://blogger.googleusercontent.com/img/b/R29vZ2xl/AVvXsEgJWKW_dBnyboNqQiy2J_wHuThW1gYkXkyHjE241QAqVFBm_gO7cuDoxRqloviI4UgVKWHOJQMLnoRrPyoomz5uqESaNAlYL7cKqtD_D3lFyQpBLPqPNULp21neas97B5kEpWrQlGgFEok/s1600/Root-Asus-Zenfone-5.jpeg "How to Root ASUS ZenFone 5 Kitkat 4.4.2[Guide]")
![How to Root ASUS ZenFone 5 Kitkat 4.4.2[Guide] logo](https://blogger.googleusercontent.com/img/b/R29vZ2xl/AVvXsEgxFuFSg-5ymuT_deJ2DfiC5kpAasXX0XJtW27O6FihG4QDAz6mCnrXkI-S8FKjx2Dv1LqOAkyV8sAVoMwrcV1zniw8Z7U2aQjMPsGiDSzEnUgRYi5-Dohpjg1Jj4mMWacQS2dOzcvmi9U/s1600/Install-Asus-Intel-Drivers.jpg "How to Root ASUS ZenFone 5 Kitkat 4.4.2[Guide]")
![How to Root ASUS ZenFone 5 Kitkat 4.4.2[Guide] logo](https://blogger.googleusercontent.com/img/b/R29vZ2xl/AVvXsEjWdQ3ow2ZIVn6gYI8PyQCuxNuCsBxxBp5E0DdyyiyzaqNHiPj7Ds6oLgJ56uX7MYujtrAZ5YM8Sdpc8GyNDr8hUkF2nUDsGD2GHh5POZQGHi_NKtyGtLPpJHpDp-qiz2OXDbzWn-euq-U/s1600/Screenshot_2014-10-30-14-48-58.jpg "How to Root ASUS ZenFone 5 Kitkat 4.4.2[Guide]")
![How to Root ASUS ZenFone 5 Kitkat 4.4.2[Guide] logo](https://blogger.googleusercontent.com/img/b/R29vZ2xl/AVvXsEgvpT5dOYIRgWmKqwTMkfzoWzzfsC53rw05-PQ3AvqLe-HqiDCMIijsqM5vubPdrDXBlgxCy0vutT61Utq80_EQ_1TDpKUU9COcxiU22OXx49-C4MLN0sWCHhXdbiDSK_Clm3luv6U_PY8/s1600/open-cmd-root.jpg "How to Root ASUS ZenFone 5 Kitkat 4.4.2[Guide]")
![How to Root ASUS ZenFone 5 Kitkat 4.4.2[Guide] logo](https://blogger.googleusercontent.com/img/b/R29vZ2xl/AVvXsEjfxFolWsbId0gQS56lkOmkj-MyG0OS2yF5NJSQW_zPX72RNI9GtUxWyk0z4CQr0pyLC7m1NmK1TqFvVBHXvdy3hWNNux0I-EF589csbimNJiYudTzExYWEiPQkCv7rKe2xEz68mQhatak/s1600/33.JPG "How to Root ASUS ZenFone 5 Kitkat 4.4.2[Guide]")
![How to Root ASUS ZenFone 5 Kitkat 4.4.2[Guide] logo](https://blogger.googleusercontent.com/img/b/R29vZ2xl/AVvXsEhpEdNojP1k39c6i5KPLxi_Hbe4ORc-uZ1xpIjtygW48YVro3u7orK4PmXgDAH0sXIe0Plnk1cJIUp3Vz5jqyh2GzmZKYqjvRoEspPvTS1vAHsl1hcDZtvMsoE3Xer6K3SQWfCvnQWGUoA/s1600/allow-usb-debugging.jpg "How to Root ASUS ZenFone 5 Kitkat 4.4.2[Guide]")
![How to Root ASUS ZenFone 5 Kitkat 4.4.2[Guide] logo](https://blogger.googleusercontent.com/img/b/R29vZ2xl/AVvXsEheiwBnYOv23xr2nXXvZi4yxpEh0gl0Zjz0ES_qYgAZNkfXzPOLLf7vfEzySdMQQx7fBFIUe6GoRGRyGo3GdlcOpnMieqqrHWUTAJnWTfrfP42B3NvBHsnMw0cICP44DoKIvVXuaohzh9w/s1600/30+%25282%2529.JPG "How to Root ASUS ZenFone 5 Kitkat 4.4.2[Guide]")
![How to Root ASUS ZenFone 5 Kitkat 4.4.2[Guide] logo](https://blogger.googleusercontent.com/img/b/R29vZ2xl/AVvXsEhVWkdKEK9OhlruNRIqKenxON_3pOjCeqp6kUYmNj47d3g4VN9licZjAP5Sf0hfr48qWbam7RGWxHb2vD0ZHbw-aVrI0QmrlTPjk5Ugpkp7xCEi_6XLL5H7GOTx-nrs_GYORAgOTbb_KsU/s1600/26.JPG "How to Root ASUS ZenFone 5 Kitkat 4.4.2[Guide]")
![How to Root ASUS ZenFone 5 Kitkat 4.4.2[Guide] logo](https://blogger.googleusercontent.com/img/b/R29vZ2xl/AVvXsEjtlby5jItggFN2WKVslHUhJiqryUMK5TkmfmcTSG6vQ7ERPxuesY4KNKkH1-XQL5JTmn2hDSUgjSS0_Wf0s_W-tdlY8qhAyFzg91NUi0NUJgVAkw8hUpcSnZ3ugDXcG09EP6olnJpy9I4/s1600/Screenshot_2014-10-30-15-49-32.jpg "How to Root ASUS ZenFone 5 Kitkat 4.4.2[Guide]")
![How to Root ASUS ZenFone 5 Kitkat 4.4.2[Guide] logo](https://blogger.googleusercontent.com/img/b/R29vZ2xl/AVvXsEjYSTjELS1OgJLfICVWzLY12EgXy6oBS-3QH4F899kuSYONQnJMAubokZSMZdiwu1i6CPtHqZU8zzG_yQJtne2ALFTQK2005Ck0j7yez0I6sTxaUbQHQKyFuKSlzwqz7DZLm77S-TnU0p0/s1600/Screenshot_2014-10-30-15-51-28.jpg "How to Root ASUS ZenFone 5 Kitkat 4.4.2[Guide]")

